Import a .CSV file for Bank Reconciliation in Business Central
Introduction:
This blog will guide you in importing a .CSV file for Bank Reconciliation.
This blog will guide you in importing a .CSV file for Bank Reconciliation.
Pre-requisites:
- Dynamics 365 Business Central
Steps:
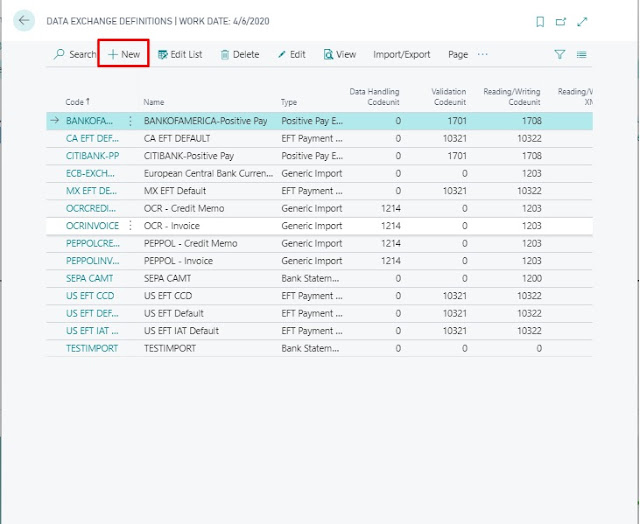
Step 1: Search for Data Exchange Definition in Tell me/Search Icon and open it, Create a new Data Exchange Definition and enter the code and name.
Step 2: In the new Data Exchange Definition add the following fields.
- File Type - Variable Text
- Type - Bank Statement Import
- Reading/Writing Xml Port - 1220
- Ext Data Handling Codeunit - 1240
- You can also add the number of Header lines that are present in .CSV file in the Header Lines field. I have one Header Line so I have put 1.
Step 3: In the Line Definitions Tab, enter the Code and Number of Columns that are present in the .CSV file. I have 7 columns so I've put them accordingly.
Step 4: In Column Definitions put Name of Columns according to your .CSV file and their Data type as well.
Step 5: Now click the Field Mapping Action on Line Definitions tab.
Step 6: The Field Mapping window opens, Create a new one and populate the following fields:
- Write the Name of the Mapping.
- Table ID - 274
- Mapping Codeunit - 1248
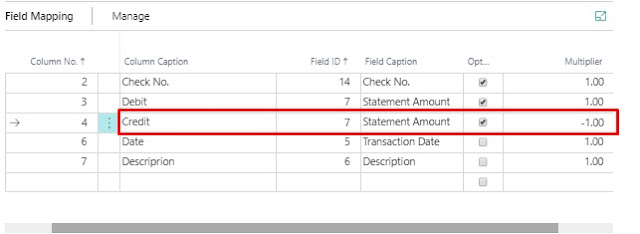
In .CSV file we have Two columns Debit and Credit, and we have mapped both of them in the Statement Amount field of the "Bank Acc. Reconciliation Line" table, so to differentiate between these two we put Credit Amount as Negative, How do we achieve it? I have a solution for this, I tried using Transformation Rule but it didn't really work for me, so I added one hidden field "Multiplier" using Personalize in Field Mapping Tab which shows Multiplier as "1", in this field I have changed it to "-1" for "Credit" field.
Step 7: Search for "Bank Import/Export Setup" and open it. Create a new Bank Import Export Setup.
- Add Code and Name of New Bank Import/Export Setup
- Processing Codeunit ID - 1270
- Data Exc. Def. Code - The Data Exchange definition we have created ie. TESTIMPORT
Step 8: Now go to the Bank Account for which you have your statements to reconcile in .CSV file and add your above created Bank Import Export Setup in the "Bank Statement Import Format" field.
Step 9: Go to the Bank Account Reconciliation page and create a new one and select the Bank account for which you want reconciliation to be done.
Click Action "Import Bank Statement" on the Bank Account Reconciliation Card page.
Conclusion:
This is how we can achieve importing a .CSV file in Business Central for Bank Reconciliation.
Hope this helps!


Very helpful
ReplyDeleteThanks for nice post on Bank Reconciliation. But in my case, it is only taking one value which is deposit amount but i have mapped both deposit account and Withdrawal account to Statement Amount, could you please give guide what could be the reason
ReplyDelete